After logging in to the Trackimo website with your username and password, you will reach the Trackimo dashboard. The image below depicts the Trackimo dashboard with a short explanation in the table below about the key items within the dashboard.
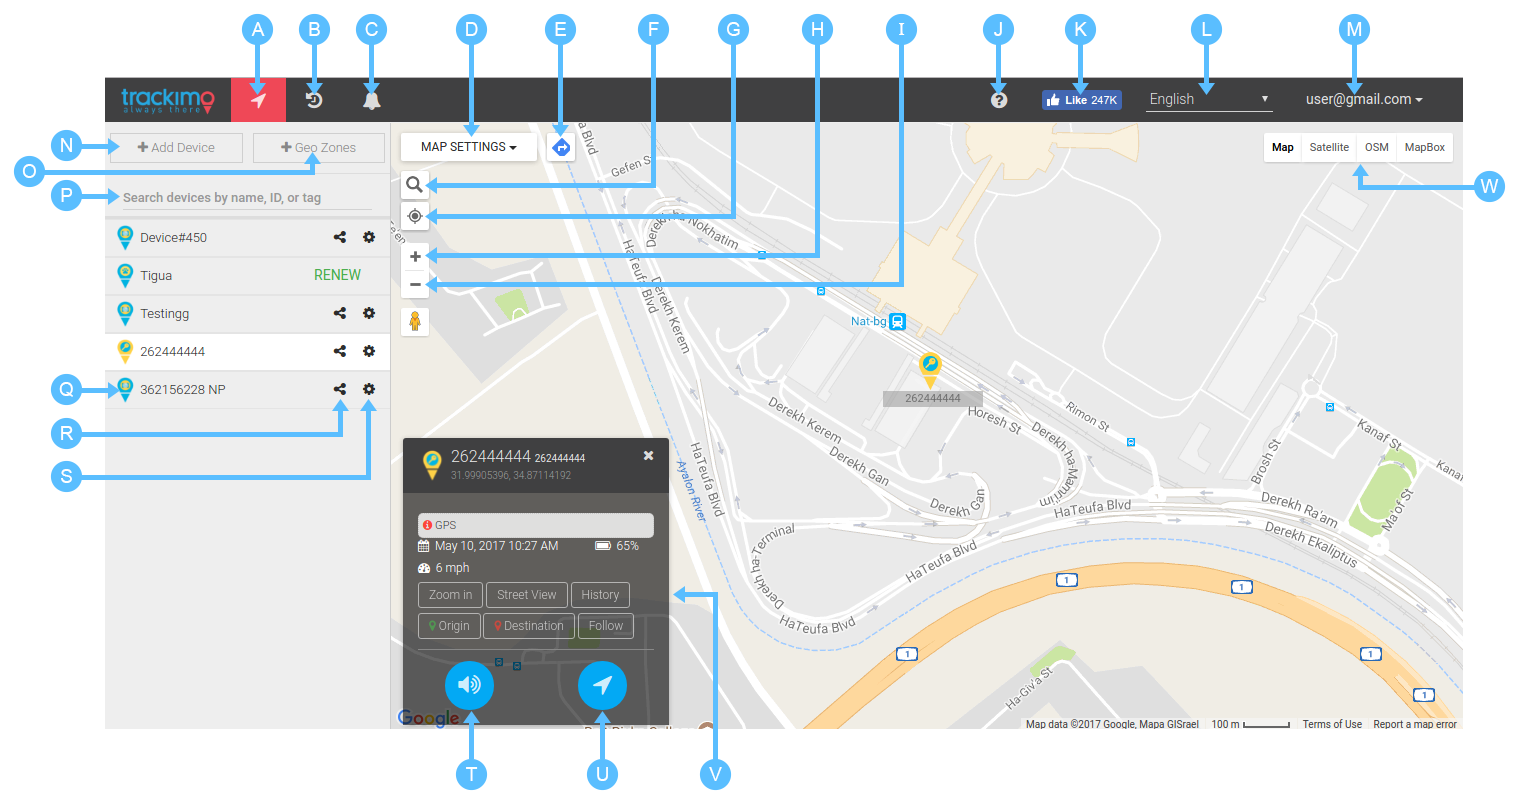
A|Map View|In the homepage, this is where you can view all your Trackimo devices as seen on the map.
B|History|The history shows the different locations representing where your device has been at certain periods. Select the dates that you want to check, and it will take you to a more detailed track of your device history.
C|Notifications|Alerts the user to the number of unread device notifications, and upon clicking the menu shows all device notifications.
D|Map Settings| This will show different map configurations, whether you want to see the cluster devices, have the map show device names, or show traffic.
E|Directions|Get directions to your next destination by clicking on the button. Input data as necessary so that the device can calculate possible routes.
F|Search| Allows you to view a location, check for directions, or calculate distance.
G|Location|Shows your current location.
H|Zoom In|Allows you to zoom in your view of the map
I|Zoom Out|Allows you to zoom out your view of the map
J|Instructions|This will lead you to instructions and information regarding your device
K|Facebook Like Button|Stay connected with Trackimo by hitting the like button
L|Language|Allows you to customize the language used in the app.
M|Profile|Shows account info and contacts. It will also allow you to log out of the app.
N|Add Device|This section allows you to add and activate another device in your Trackimo account.
O|Geo Zones|This allows you to add, customize, and view your virtual fences.
P|Search Devices|Filter devices by name, Device ID number, or tags.
Q|Device Icon| This shows you the Device ID number or name as customized.
R|Share|Allows you to share device location information for a limited time via a URL to anyone.
S|Device Settings|Allows you to customize your device, set alarms, or manage subscription as necessary.
T|Send Beep|Allows device to give off a low beeping sound.
U|Update Location|Allows you to trigger an update from the device, manually.
V|Device Info|Shows device information, including address of last location, time of last update, and battery status.
W|Map View|Shows different types of maps including the default view, satellite view, OSM view, or Mapbox view.